Building a CM Lab in 2025: Configuring The CM Siteserver
- Matt Zaske
- March 10, 2025
- 9 minutes
In the first post of this short series, I wrote about using the Deployment Research Hydration Kit to build out the basic infrastructure behind a CM lab. If you're following along, you'll have a set of servers at your disposal (a domain controller and a Configuration Manager Siteserver).
Once the CM Siteserver is built out, I check for OS updates and once those are in installed reboot the box. Then I'm ready to roll with the next phase of the lab setup!
First: Update Configuration Manager!
When you launch the CM console application on the first go, usually you'll be alerted to site updates and other bits. The little bell icon in the upper right-hand corner of the window will indicate this.
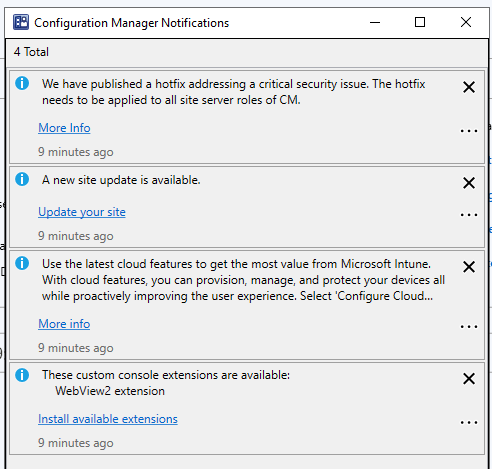
You can also get to the update panel by navigating to Administration → Updates and Servicing, where you'll see a list of available updates (similar to below):

Right click on the update in question and Install Update Pack to get started. The wizard will begin:
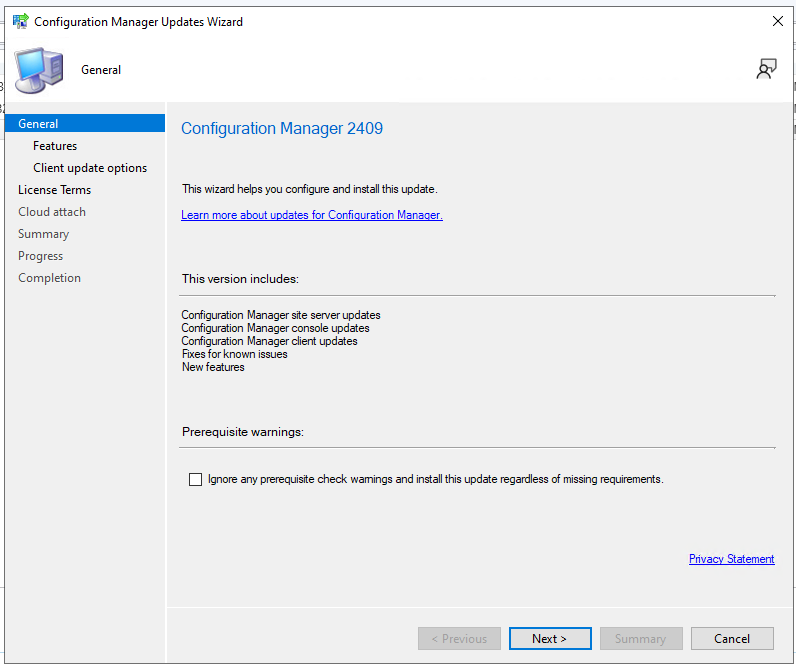
You'll need to accept the license terms and complete or uncheck the cloud attach options. Cloud attach is optional, and I usually skip it unless I need to connect my CM lab environment to my Intune developer tenant. This is a useful thing to set up if you're working through co-management. But is not necessary for the purposes of a basic standalone lab.
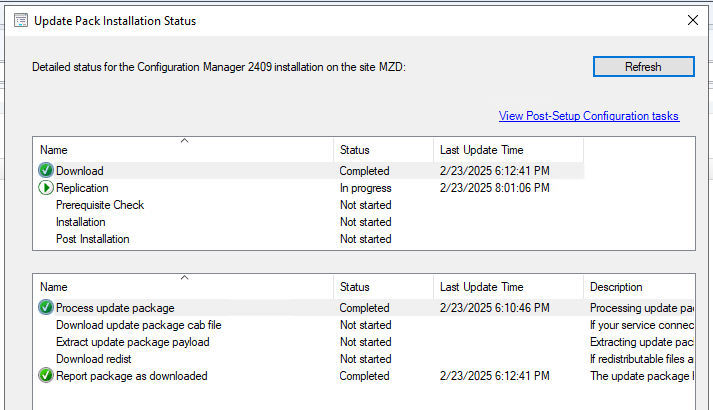
Once your upgrade has started, keep an eye on the progress by jumping over to the Monitoring → Updates and Servicing Status panel. Right-click on the running update and select the Show Status option:
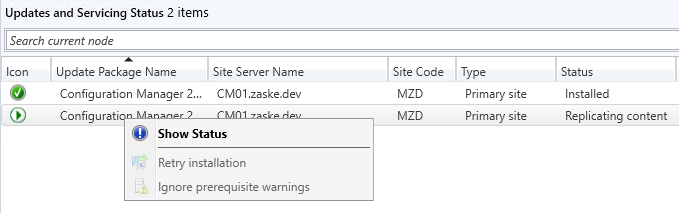
The dialog allows you to watch/refresh/monitor the progress. A site upgrade can take a significant amount of time, and toward the end of the upgrade you may get an error when refreshing the status (which is weirdly a good sign to me as the end is near and the console needs to be re-launched).
Once the update(s) are complete, you're ready to actually do some configuration!
Basic Site Configuration
A few years back, Gary Blok wrote a series hosted by Recast Software called "Building a ConfigMgr Lab from Scratch." It's a wonderful visual complete step-by-step walkthrough of an entire lab setup. I skip over several parts the hydration kit does it for me, but it's still a good read to understand those foundational bits even if you're lazy like me and use a kit. To that end, I still use the series as I configure the lab after hydration, using the following process and Gary's guidance along the way.
Optional Starting Point: Skip to Step 3
Step 3 in the Recast series is optional, but if you intend to run SSRS or host a web server in the lab start about halfway through the post at the point where a Certificate Template is created. The hydration kit handles configuring the Certificate Authority on our domain controller (the first part of the post). Most of this work is on the domain controller, and the relevant bits compose about a quarter of the post. You can end at the point of enrolling a cert, since you (probably) don't have a web server at the ready.
I usually create a "Web Server Cert Enrollment" AD group of which my CM Siteserver is a member. This will allow it to enroll should we need it down the road.
Required Starting Point: Step 5
Step 5 in the Recast series is where we really start getting into configuring our freshly-minted Siteserver. Step 5 outlines the things you'll need to set up for accounts/groups and policy, again on the DC. Since the hydration kit handles most bits of this, here's what I add in my own lab for accounts and groups:
- A lab admin ("super admin") account for myself
- A regular user (non admin) account for myself
- A "CM Server" group with the
CM01server as member (others can be added if necessary) - A "LabAdmins" group with the aforementioned lab admin account as member
- The "Web Server Cert Enrollment" group exists because of optional step 3

If you're preparing a lab for longer-term use or other special needs, what Gary suggests for AD groups is very useful.
Regarding basic lab-wide Group Policy, I create one custom "Site-wide" policy for my lab (others are created later for niche cases and testing if/as necessary). This policy is applied broadly across my lab domain, similar to the scope for default domain policy, and sets the following things:
- Enables "
Do not require CTRL+ALT+DEL" setting in Interactive Logon policy - Configures a default desktop background for branding ("pretty matters")
- Adds the "
LabAdmins" group to the localAdministratorsgroup of computers in scope - Adds specific users to the
Remote Desktop Usersgroup of computers in scope - Enables Remote Desktop access and configures Firewall policy
I scope this policy broadly because my lab is low risk and I'm the only person using it. Be judicious about how you scope stuff that allows for RDP and adding accounts to Administrators. And also, I hate CTRL+ALT+DEL to log in on, especially in my lab.
The Source Share
In step 6 of the Recast series, Gary shows a neat way to configure your CM source share. I don't personally create the alias since I use the same naming convention in my source share between building lab iterations, but it's a cool way to help Future You.
I use the same settings Gary illustrates in the post for my source share.
Finally: ConfigMgr Configuration!
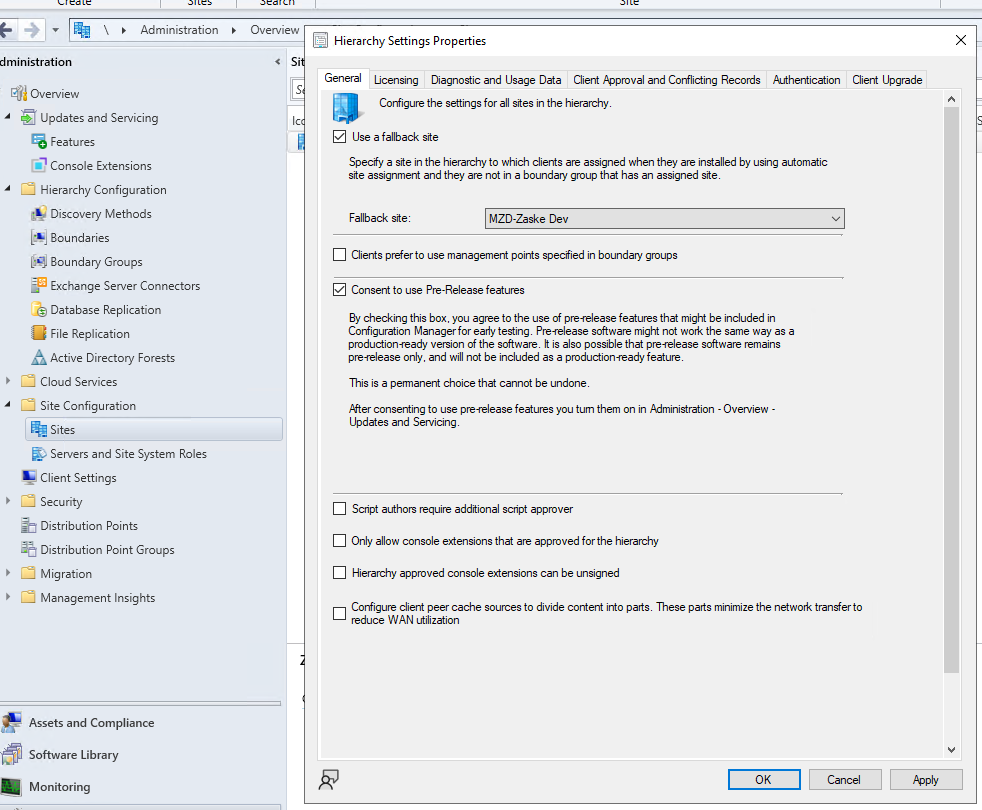
The hydration kit handles all of the things in steps 7 and 8 of the Recast series, so those can be skipped. That brings us to step 9 in the series, a meaty post with lots of great detail and images. For the most part I follow Gary's configuration as written. Some options have changed or been renamed since Gary wrote the series, but my hierarchy settings are pretty identical:
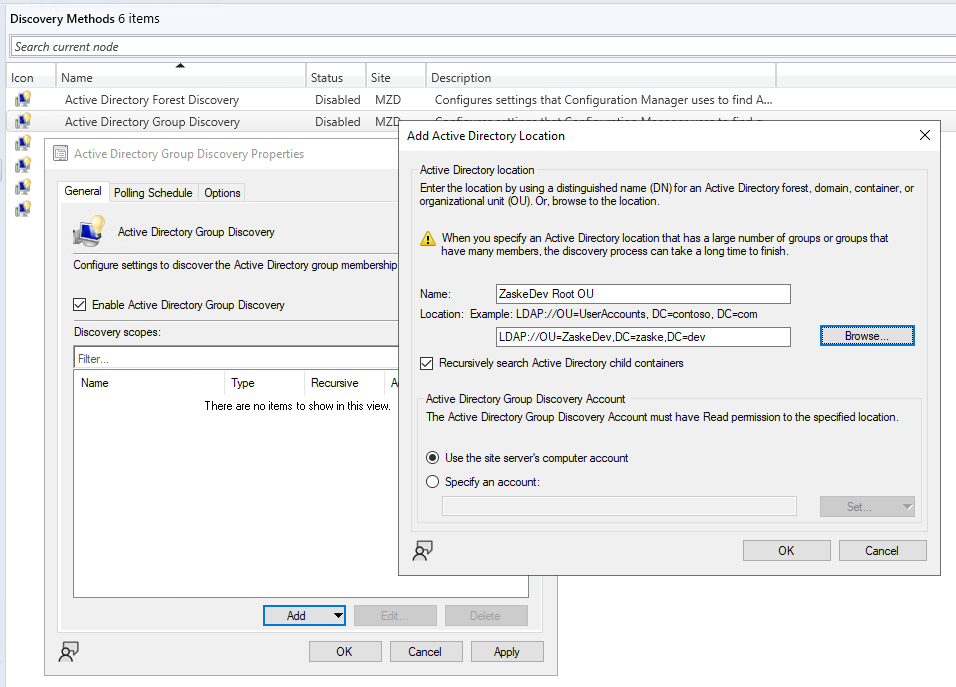
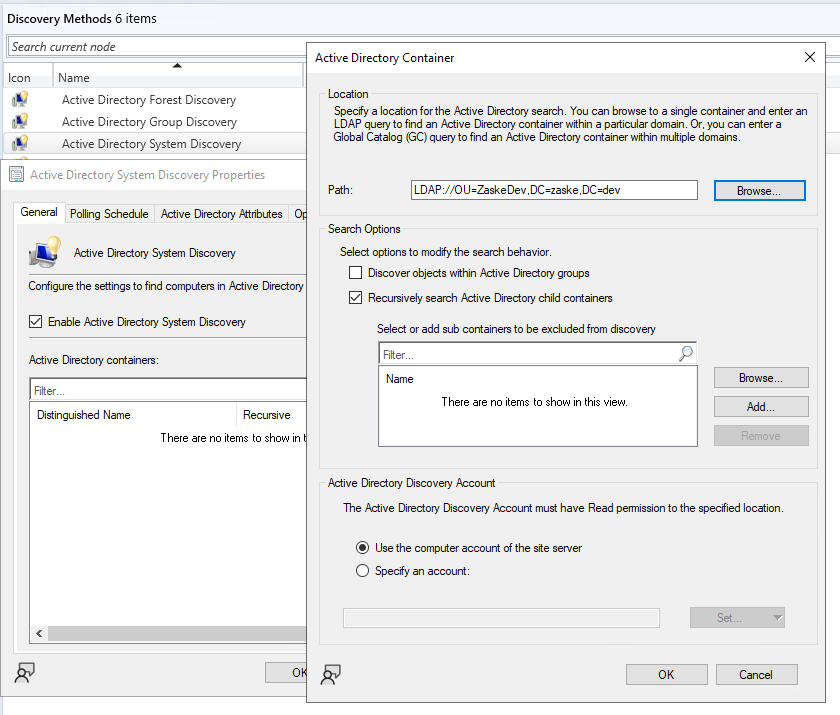
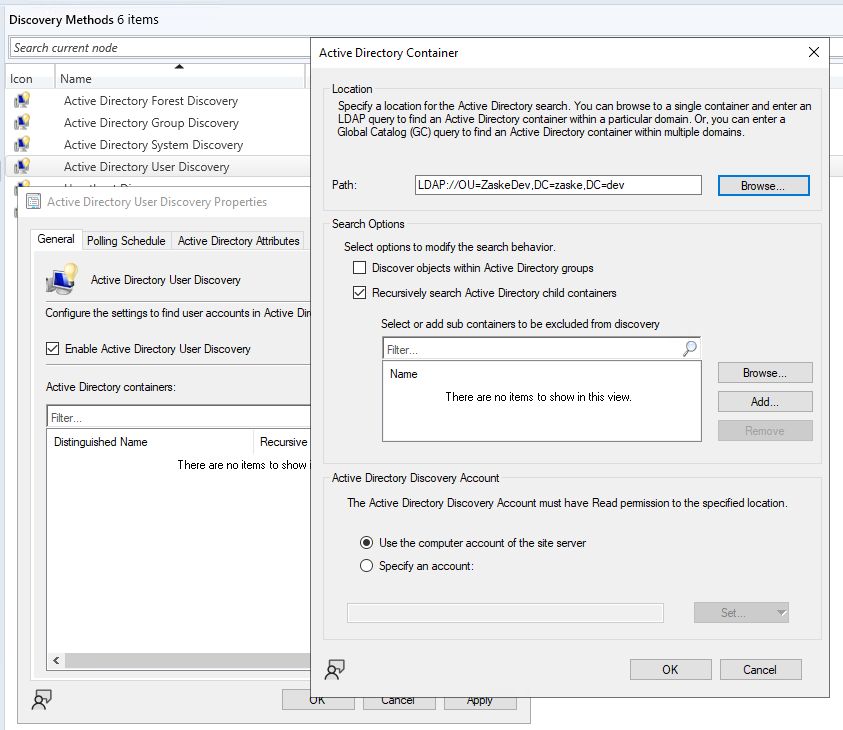
In the Discovery Settings section, I use settings that match the LDAP paths of my custom domain:
I use all the same settings as Gary illustrates for DP settings and boundary groups, with the only difference being the subnet for my lab (which is usually the kit default of 192.168.25.0).
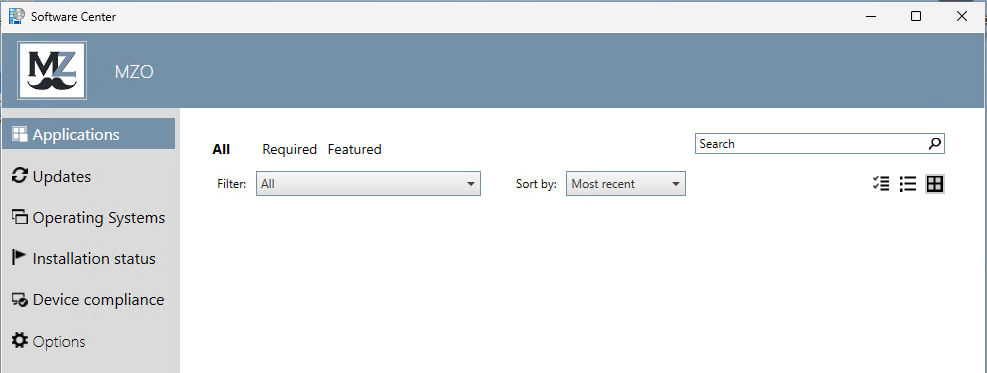
In client settings, I use the same as Gary identifies except I brand my Software Center differently:
I don't set up a Network Account since it's not necessary in my lab configuration. This can also (and should also) be skipped unless you require it in your lab.
Basic CM Site Collections
Step 10 in the Recast series has a wealth of information about creating and populating collections (along with the community script to automatically create a boatload of potentially useful collections). I have used the script, but most of the time I manually create the 3-5 collections I need for a given instance/project. But if I need more than a few, I consult the script since it's a timesaver.
It's useful to note that I don't really ever deal with user-based collections because it's not effective in my work/production environment, so typically I just create a few collections for testing OSD out of the gate in the initial configuration:

At this point you should have a fully functional Configuration Manger site ready to do some OSD testing!
Adding Clients and Using Operating System Deployment
The last step I follow in the Recast series is step 11 - ConfigMgr OSD. I follow this step pretty completely, with one exception now that I've built out the lab several times — I don't usually build a Task Sequence from scratch. I always re-import what I exported from a previous lab build. This saves a ton of time and usually just requires a few touch-ups on a fresh lab build:
- Pointing the imported Task Sequence(s) at the new boot media
- Updating the imported Task Sequence(s) to use the current Windows WIM
- Re-authenticating the
CM_DJaccount in theApply Network Settingsstep for joining the new domain - Ensuring the Task Sequence(s) are pointing at the correct Client package for the new site in the
Setup Windows and Configuration Managerstep
Once those task sequences are updated and appropriately deployed to the collection(s), I can attempt to run my Bare Metal Test Task Sequence!
When It Doesn't Work (After An Import)...
I like using my Bare Metal Test TS as the first attempt, because it's stripped down to the basics and ensures my lab core is functioning as expected. If I encounter a problem with running a Bare Metal test it's either a configuration step I missed (or typo'd), or more often a distribution or pointer problem with the content I re-imported:
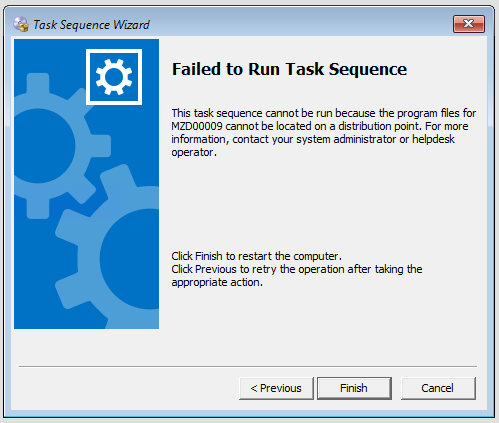
In the above image, this error was a result of not properly distributing the Windows WIM I was using. Jumping into the Operating System Images panel and distributing the content sorted this out almost immediately.
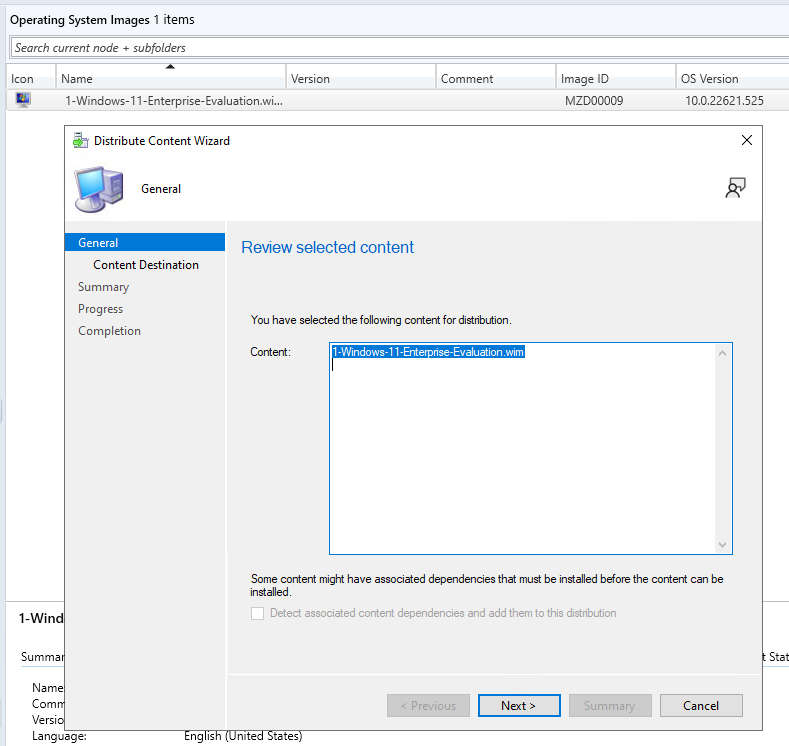
After the content distributed my Task Sequence completed without issue!
Hooray! A Client Exists!
I have a client available to play with now, but it's named with the MININT prefix. Again this is useful to start, but not a good example of a "production" client device. Since I know core OSD functions are working, I can now create (or import) more proper Task Sequences that can be debugged, enhanced, etc.
A Lab Was Born
With these steps, I have my core lab rebuilt and can Do Things for the next few months. The two key resources referenced in these posts are excellent (Deployment Research Hydration Kit and the Recast series), but overkill for my basic needs. Building a lab doesn't need to be complicated, and these resources help substantially reduce the complication. I've tried to further reduce the complexity to rebuild my lab, so hopefully what I follow is useful for your own journey.
I am planning to release a few additional posts to walk through deploying clients of my lab environment. Specifically how and where I use OSD Task Sequences for building lab clients and also where I use OSDCloud for clients. Stay tuned!
Recent Posts
Past Speaking Engagements
I was a speaker at MMSMOA, May 3-7, 2026!
I was a speaker at MMS Music City Edition, October 12-15, 2025!
I was a speaker at TCSMUG Autopilot/OSD Day, July 15, 2025!
![]()
I was a speaker at MMSMOA, May 4-8, 2025!
I was a speaker at BrainStorm K20 Wisconsin Dells, March 9-11, 2025!
I was a speaker at MMS Flamingo Edition, October 20-23, 2024!
I was a speaker at TCSMUG OSD Day, July 31, 2024!
![]()
I was a speaker at NWSCUG, July 19, 2024!
![]()
I was a speaker at MMSMOA, May 5-9, 2024!
I was a speaker at BrainStorm K20 Wisconsin Dells, March 10-12, 2024!
I was a speaker at MMS Miami Beach, October 29-November 1, 2023